위 싸이트 참고하여 GPU 환경 설정하려 하다가
어차피 내 PC의 GPU성능이 안 좋다는 걸 알았다.
참고로 cuda 버전 확인할 때 nvidia-smi의 환경변수 설정이 안되어 있는걸 모르고 애먹었는데,
이건 아래와 같이 해결가능하다.
CUDA 버젼 확인 방법1
nvidia-smi
1. cmd창 열기(명령 프롬프트)

2. nvidia-smi.exe 경로 접근
cd C:\Program Files\NVIDIA Corporation\NVSMI
3. nvidia-smi.exe 실행
nvidia-smi.exe

4. 환경변수 설정
매번 경로로 접근하기 귀찮기 때문에 환경변수로 설정해두자. 먼저 시스템 환경변수 편집에 들어간다.

path에 exe파일의 경로를 추가한다.

cmd창을 한번 껐다가 켜면 아래와 같이 경로에 접속하지 않아도 실행 가능하다.

작업 관리자
검색으로 작업 관리자를 켜서 gpu에서 노란 하이라이트 친 부분을 클릭해 3D에서 Cuda로 변경한다.

CUDA 버젼 확인 방법2
CUDA 및 파이토치 버전 확인 및 관리
Pytorch를 사용하는 경우 CUDA 버전을 확인하고,
쿠다와 호환이 잘 되는 파이토치 버전으로 변경해주어야 하는
경우가 있을 수 있습니다.
이번 글에서는 간략하게 파이토치를 최적으로 사용하기 위한
환경에 대해 점검하고 버전을 관리하는 방법을 말씀드려보도록 하겠습니다.
쿠다 버전 확인법
CUDA 버전을 확인하는 방법은 명령 프롬프트에 $ nvcc --version를 입력하시거나,
ipynb 파일의 셀 내에 !nvcc --version를 입력해주시면 됩니다.

출력 결과에서 마지막 줄의 숫자를 확인해보시면 됩니다.
예시로 코랩 환경에서 CUDA의 버전을 조회해본 결과,
11.1 version을 사용하고 있는 것을 알 수 있었습니다.
혹은, 아래의 pytorch version을 체크하는 방법으로도 같이 조회가 가능합니다.
파이토치 버전 확인법
다른 모듈의 version 체크 방법처럼
torch 모듈을 import 해주신 뒤, __version__ 속성으로 조회해주시면 됩니다.
import torch

torch.__version__
# 1.10.0+cu111
pytorch는 1.10.0을 사용 중이었으며,
cu111인 것을 보아 11.1 버전의 CUDA를 사용하고 있다는 점도 확인이 가능했습니다.
해당 CUDA와 호환이 잘되는 torch의 버전 목록은 아래 사이트에서 확인이 가능합니다.
https://download.pytorch.org/whl/cu111/torch_stable.html
다른 쿠다의 경우, url의 가운데 cu111 부분을
9.2에서는 cu92, 10.1에서는 cu101처럼 바꿔주시면 됩니다.
파이토치 업그레이드 방법
원하는 버전으로 torch 모듈을 업데이트하는 방법은
아래의 명령어를 명령 프롬프트나 ipynb의 셀 내에 입력해주시면 됩니다.
pip install torch --upgrade version==1.10.1참고로, 구버전으로 다운그레이드하는 경우도 진행이 가능합니다.
AWS로 딥 러닝 모델 학습하기
Train a Deep Learning model with AWS Deep Learning Containers on Amazon EC2
Sorry to disappoint you Is something out-of-date, confusing or inaccurate? Please help us improve this tutorial by providing feedback.
aws.amazon.com
심심할 때마다 프로그래머스, 원티드 같은 취업사이트에서 머신러닝 엔지니어를 구직하는 글을 보곤 한다. 많은 회사들이 AWS, GCP 등 클라우드 서비스에서 딥 러닝 모델을 학습시켜본 경험을 요구한다. 그래서 미리 경험도 좀 쌓을 겸 우선 예제들을 돌려볼 계획이다. 그중 첫번째로 딥 러닝 모델 학습이라는 예제를 가져왔다. 열심히 공부해보자.
Train a Deep Learning model with AWS Deep Learning Containers on Amazon EC2
이 튜토리얼은 한글 버전이 없다. 원제는 위와 같이 나와있다. 여기서 EC2는
아마존 일래스틱 컴퓨트 클라우드 (Amazon Elastic Compute Cloud, EC2)는 아마존닷컴의 클라우드 컴퓨팅 플랫폼 아마존 웹 서비스의 중앙부를 이루며, 사용자가 가상 컴퓨터를 임대 받아 그 위에 자신만의 컴퓨터 애플리케이션들을 실행할 수 있게 한다. EC2는 사용자가 아마존 머신 이미지(AMI)로 부팅하여 아마존이 "인스턴스"라 부르는 가상 머신을, 원하는 소프트웨어를 포함하여 구성할 수 있게 하는 웹 서비스를 제공함으로써 스케일링이 가능한 애플리케이션 배치(deployment)를 장려한다. 사용자는 필요하면 서버 인스턴스를 만들고 시작하고 종료할 수 있으며, 실행 중인 서버에 대해 시간 당 지불하므로 "일래스틱"(elastic, 탄력적인)이라는 용어를 사용하게 된다. EC2는 사용자에게 레이턴시 최적화와 높은 수준의 다중화를 허용하는 지리학적 인스턴스 위치에 대한 통제 기능을 제공한다.
라고 위키피디아에 나와있다. 간단히 말해서는 가상머신 즉, 서버 컴퓨터를 하나 만들어 준다는 의미다. 이 예제는 아마존으로부터 EC2를 하나 받아 거기서 딥 러닝 모델을 학습하는 과정을 설명하는 것이다.
0. 개요
AWS Deep Learning Containers (DL Containers) are Docker images pre-installed with deep learning frameworks to make it easy to deploy custom machine learning environments quickly by letting you skip the complicated process of building and optimizing your environments from scratch.
Using AWS DL Containers, developers and data scientists can quickly add machine learning to their containerized applications deployed on Amazon Elastic Container Service for Kubernetes (Amazon EKS), self-managed Kubernetes, Amazon Elastic Container Service (Amazon ECS), and Amazon EC2.
In this tutorial, you will train a TensorFlow machine learning model on an Amazon EC2 instance using the AWS Deep Learning Containers.
- AWS Deep Learning Containers (DL containers)는 딥 러닝 프레임워크 (ex PyTorch, TensorFlow)가 설치되어있는 도커 이미지다.
- AWS DL Container를 사용하면, 개발자와 데이터 분석가들이 빠르게 Kubernetes나 EC2에 머신러닝을 더할 수 있다.
- 이 예제에서는 AWS DL Container를 사용하며, Amazon EC2에서 TensorFlow model을 학습시킬 것이다.
1. AWS 가입하기
https://portal.aws.amazon.com/billing/signup
AWS Console - Signup
portal.aws.amazon.com
계정이 없다면 가입하자. 이 예제에서는 Amazon c5.large instance를 사용해서 $1보다 적게 비용이 든다고 한다. AWS에서는 가상머신을 instance라고 한다.
2. Amazon ECR에 접근하기 위한 permission 얻기
AWS Deep Learning Container images are hosted on Amazon Elastic Container Registry (ECR), a fully-managed Docker container registry that makes it easy for developers to store, manage, and deploy Docker container images. In this step, you will grant an existing IAM user permissions to access Amazon ECR (using AmazonECS_FullAccess Policy).
If you do not have an existing IAM user, refer to the IAM Documentation for more information.
AWS Deep Learning Container images는 Amazon Elastic Container Registry (ECR)에 호스트된다. 이 과정에서 Amazon ECR에 접근하기 위해 IAM user permissions이 있어야한다.
a. IAM console 접속

AWS console에 들어가서 서비스 찾기에 iam이라고 치면 IAM이라고 뜬다.
b. 사용자 클릭

c. 사용자 추가 및 add permission
- 사용자 추가
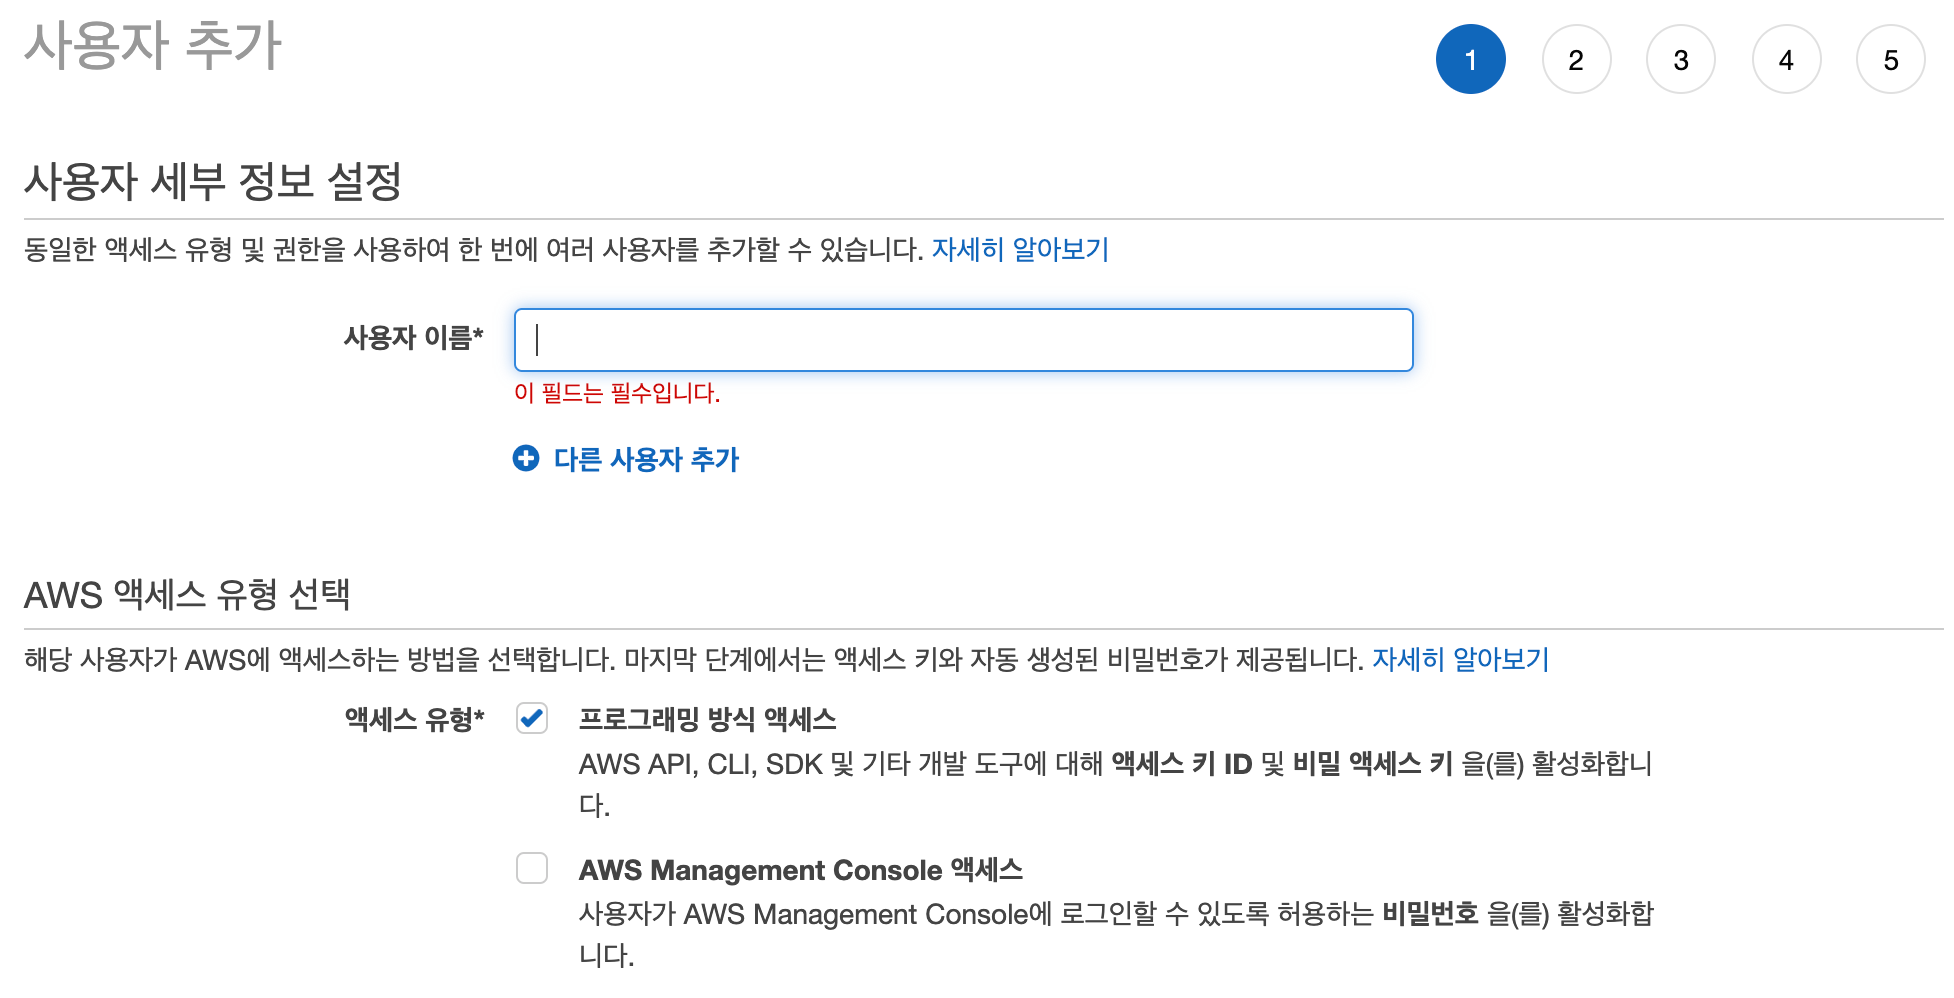
엑세스 유형은 CLI를 사용할 줄 알아야 한다는 프로그래밍 방식 엑세스를 클릭했다.
https://docs.aws.amazon.com/ko_kr/IAM/latest/UserGuide/id_users_create.html
AWS 계정의 IAM 사용자 생성 - AWS Identity and Access Management
사용자 이름에는 최대 64개의 문자, 숫자 및 더하기(+), 등호(=), 쉼표(,), 마침표(.), 앳(@) 및 하이픈(-) 조합을 사용할 수 있습니다. 이름은 계정 내에서 고유해야 합니다. 대소문자는 구별하지 않습니다. 예를 들어 "TESTUSER"와 "testuser"라는 두 사용자를 만들 수는 없습니다. IAM 엔터티 관련 제한에 대한 자세한 내용은 IAM 및 STS 제한 단원을 참조하십시오.
docs.aws.amazon.com
자세한 건 여기 참고.
- 그룹 생성


이름만 정해주자.
그리고 계속 다음 누르다보면 마지막에 csv 파일을 다운로드 할 수 있다. 받아두자.

이제 만들어진 사용자를 클릭하면 위와 같은 화면을 볼 수 있고 권한 추가를 누르자.
d. ECS Full Access 정책 추가
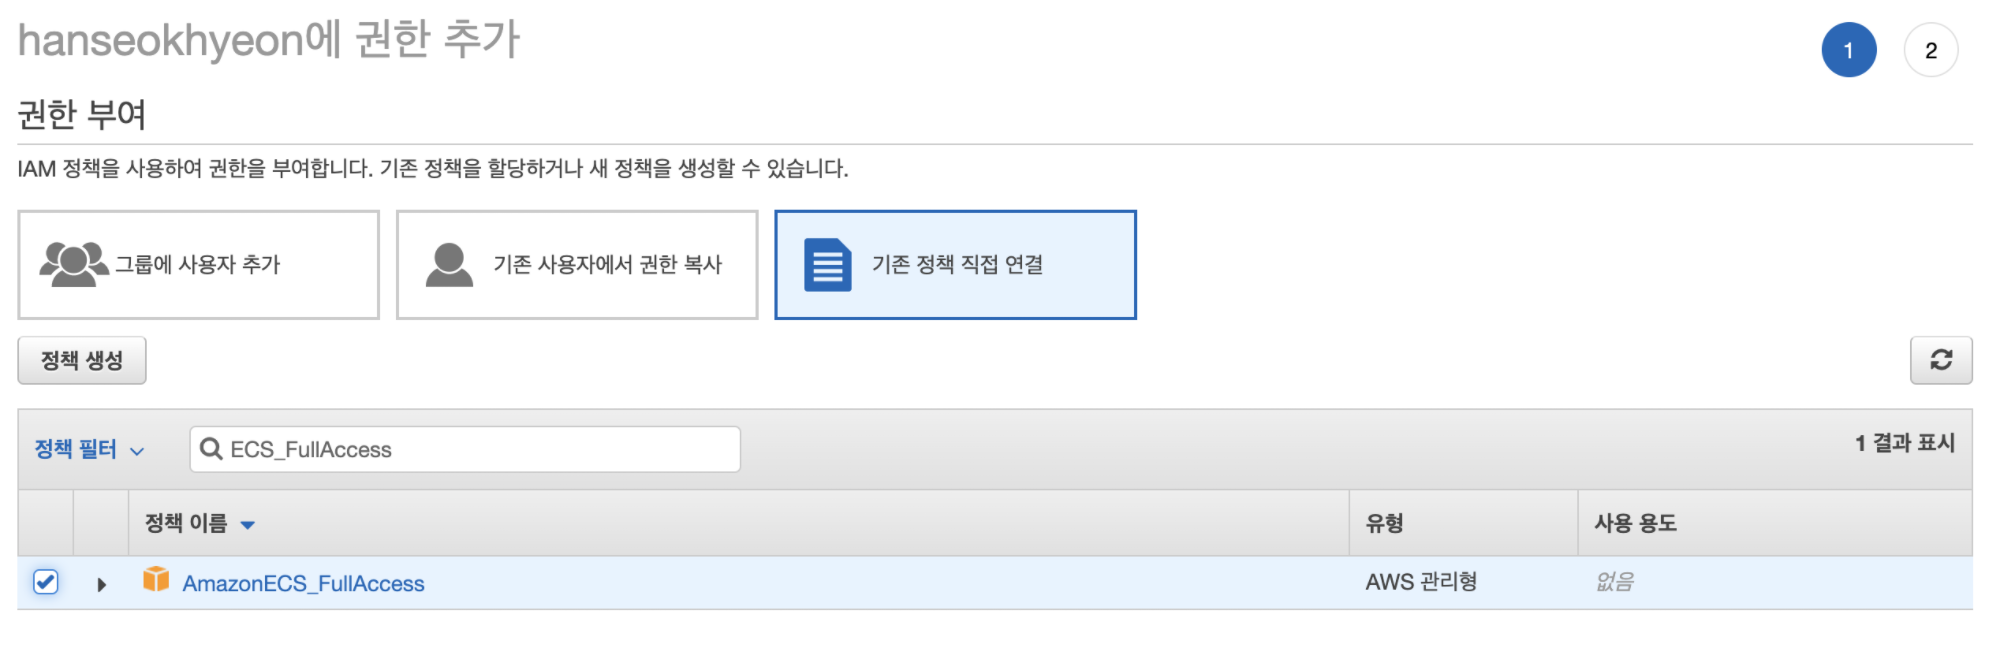
ECS_FullAccess 검색해서 정책을 연결해주자.
e. 인라인 정책 추가
오른쪽에 인라인 정책 추가라는 버튼을 누르고

이와 같이 json을 작성해준다.
까지하면 permission을 얻는 과정이 끝이난다...
3. Launch an AWS Deep Learning Base AMI instance
이 과정에서는 AWS Deep Learning Base AMI에 있는 DL container를 사용할 것이다. 이 안에는 이미 nvidia-driver, docker, nvidia-docker 등이 깔려있다.
a. EC2 instance 찾기

아까와 마찬가지로 console 메인화면에서 검색한다.
b. 인스턴스 시작

인스턴스 시작 버튼을 누르자.
c. AMI를 고른다.

deep learning base ami ubuntu라고 검색하고 AWS Marketplace를 누르면 이렇게 나온다. 맨 위에 것을 쓰자.
d. 인스턴트 타입 고르기
튜토리얼 돌릴 예정인데 막 GPU 16개가 필요하고 그러지는 않는다. c5.large를 고르자.

검토 및 시작을 누른다.
e. 인스턴스 시작

f. 새로운 키 생성

SSH로 접근하기 위해 private key가 필요하다. 없다면 새로 만들어서 다운을 받자.
g. 상태 확인

4. 인스턴스에 연결하기
인스턴스에 연결하기 위해서는 SSH를 사용한다. SSH를 사용할 줄 모른다면
https://hanseokhyeon.tistory.com/entry/Ubuntu-ssh-서버-구축하기?category=830462
Ubuntu ssh 서버 구축하기
연구실 서버 컴퓨터에서 docker를 이용해야 할 상황이 생겼다. 그래서 ssh를 이용해 로컬에서 서버로 접속해 docker를 사용하기 위해 ssh 서버 사용하는 법을 공부했고 정리한다. 1. ssh 설치 ubuntu에 로컬로 사..
hanseokhyeon.tistory.com
를 참고하자.
a. 인스턴스의 public DNS (IPv4) 복사

저 아래에 반만 가려놓은 빨간색 박스 안에 퍼블릭 DNS를 복사하자.
b. SSH로 인스턴스 접속
cd ~/Downloads/

chmod 0400 test_new_key.pem

ssh -L localhost:8888:localhost:8888 -i test_new_key.pem ubuntu@<방금 복사한 DNS>
output:
The authenticity of host '---------------.compute.amazonaws.com (-------)' can't be established.
ECDSA key fingerprint is ----------------------------.
Are you sure you want to continue connecting (yes/no/[fingerprint])?
yes라고 치자.
output:
=============================================================================
       __|  __|_  )
       _|  (     /   Deep Learning Base AMI (Ubuntu 18.04) Version 22.0
      ___|\___|___|
=============================================================================

Welcome to Ubuntu 18.04.4 LTS (GNU/Linux 4.15.0-1060-aws x86_64v)

Nvidia driver version: 440.33.01
CUDA versions available: cuda-10.0 cuda-10.1 cuda-10.2 cuda-9.0 cuda-9.2
Default CUDA version is 10.0
Libraries: cuDNN, NCCL, Intel MKL-DNN

AWS Deep Learning AMI Homepage: https://aws.amazon.com/machine-learning/amis/
Developer Guide and Release Notes: https://docs.aws.amazon.com/dlami/latest/devguide/what-is-dlami.html
Support: https://forums.aws.amazon.com/forum.jspa?forumID=263
For a fully managed experience, check out Amazon SageMaker at https://aws.amazon.com/sagemaker
When using INF1 type instances, please update regularly using the instructions at: https://github.com/aws/aws-neuron-sdk/tree/master/release-notes
=============================================================================

 * Documentation:  https://help.ubuntu.com
 * Management:     https://landscape.canonical.com
 * Support:        https://ubuntu.com/advantage

 System information disabled due to load higher than 2.0

 * Kubernetes 1.18 GA is now available! See https://microk8s.io for docs or
   install it with:

     sudo snap install microk8s --channel=1.18 --classic

 * Multipass 1.1 adds proxy support for developers behind enterprise
   firewalls. Rapid prototyping for cloud operations just got easier.

     https://multipass.run/

85 packages can be updated.
56 updates are security updates.


The programs included with the Ubuntu system are free software;
the exact distribution terms for each program are described in the
individual files in /usr/share/doc/*/copyright.

Ubuntu comes with ABSOLUTELY NO WARRANTY, to the extent permitted by
applicable law.

ubuntu@ip-172-31-15-218:~$
이렇게 연결이 된다.
5. Amazon ECR에 로그인
a. Configure your EC2 instance with your AWS credentials
aws configureoutput:
AWS Access Key ID [None]: ****************
AWS Secret Access Key [None]: ******************************
Default region name [None]:
Default output format [None]:
위에서 CSV 파일로 받아놓은 파일을 열어보면 Access key ID와 Secret access key가 있다. 이를 입력하자.
b. Amazon ECR에 로그인
$(aws ecr get-login --region us-east-1 --no-include-email --registry-ids 763104351884)사실 이 명령어의 의미를 잘 모르겠다. 머 --region은 리전 정하는 거고 마지막에 registry-ids가 뭔지 모르겠다.
output:
WARNING! Using --password via the CLI is insecure. Use --password-stdin.
WARNING! Your password will be stored unencrypted in /home/ubuntu/.docker/config.json.
Configure a credential helper to remove this warning. See
https://docs.docker.com/engine/reference/commandline/login/#credentials-store

Login Succeeded
하지만 로그인은 잘 된다.
6. DL container에서 Tensorflow 돌리기
이 예제에서는 CPU instance로 tensorflow를 돌린다.
a. Run AWS Deep Learning Containers
먼저 docker를 이용해 DL container를 만들고 접속한다.
docker run -it 763104351884.dkr.ecr.us-east-1.amazonaws.com/tensorflow-training:1.13-cpu-py36-ubuntu16.04docker image가 local에 없기때문에 다운로드에 들어간다. 만약 GPU를 사용하고 싶다면 docker 대신 nvidia-docker를 사용하면 된다.
output:
Unable to find image '763104351884.dkr.ecr.us-east-1.amazonaws.com/tensorflow-training:1.13-cpu-py36-ubuntu16.04' locally
1.13-cpu-py36-ubuntu16.04: Pulling from tensorflow-training
35b42117c431: Pull complete
ad9c569a8d98: Pull complete
293b44f45162: Pull complete
0c175077525d: Pull complete
1365b8b5a858: Pull complete
48bc23b4c956: Pull complete
a0eb117d191e: Pull complete
66b02ff5f427: Pull complete
b379b7a5ac86: Pull complete
25835df539e7: Pull complete
42fc20c5c0db: Pull complete
0971bc98571d: Pull complete
367408011efb: Pull complete
ee5e0f5ff66e: Pull complete
acae1d207982: Pull complete
Digest: sha256:ab0d1015d08ee0323d98f77bf00dec2f0b98d90a665b0f2fad5e461759cbb9cc
Status: Downloaded newer image for 763104351884.dkr.ecr.us-east-1.amazonaws.com/tensorflow-training:1.13-cpu-py36-ubuntu16.04
root@4d663aa040f2:/#
다 다운로드가 되고 위와 같이 마지막에 bash가 켜지면 된다.
b. Example 다운로드
git clone https://github.com/fchollet/keras.gitgit clone을 통해 keras 예제를 가져온다.
c. Training 시작하기
python keras/examples/mnist_cnn.pyhttps://github.com/keras-team/keras/blob/master/examples/mnist_cnn.py
예제는 mnist cnn이다. CPU로만 학습하다보니 시간이 꽤 걸린다.
output:
Using TensorFlow backend.
Downloading data from https://s3.amazonaws.com/img-datasets/mnist.npz
11493376/11490434 [==============================] - 2s 0us/step
x_train shape: (60000, 28, 28, 1)
60000 train samples
10000 test samples
WARNING:tensorflow:From /usr/local/lib/python3.6/site-packages/tensorflow/python/framework/op_def_library.py:263: colocate_with (from tensorflow.python.framework.ops) is deprecated and will be removed in a future version.
Instructions for updating:
Colocations handled automatically by placer.
WARNING:tensorflow:From /usr/local/lib/python3.6/site-packages/keras/backend/tensorflow_backend.py:3445: calling dropout (from tensorflow.python.ops.nn_ops) with keep_prob is deprecated and will be removed in a future version.
Instructions for updating:
Please use `rate` instead of `keep_prob`. Rate should be set to `rate = 1 - keep_prob`.
WARNING:tensorflow:From /usr/local/lib/python3.6/site-packages/tensorflow/python/ops/math_ops.py:3066: to_int32 (from tensorflow.python.ops.math_ops) is deprecated and will be removed in a future version.
Instructions for updating:
Use tf.cast instead.
Train on 60000 samples, validate on 10000 samples
Epoch 1/12
2020-04-19 07:20:08.897979: I tensorflow/core/platform/cpu_feature_guard.cc:141] Your CPU supports instructions that this TensorFlow binary was not compiled to use: AVX512F
2020-04-19 07:20:08.922652: I tensorflow/core/platform/profile_utils/cpu_utils.cc:94] CPU Frequency: 2999995000 Hz
2020-04-19 07:20:08.922882: I tensorflow/compiler/xla/service/service.cc:150] XLA service 0x43d4710 executing computations on platform Host. Devices:
2020-04-19 07:20:08.922908: I tensorflow/compiler/xla/service/service.cc:158]   StreamExecutor device (0): <undefined>, <undefined>
2020-04-19 07:20:08.923370: I tensorflow/core/common_runtime/process_util.cc:71] Creating new thread pool with default inter op setting: 2. Tune using inter_op_parallelism_threads for best performance.
60000/60000 [==============================] - 58s 966us/step - loss: 0.2549 - acc: 0.9215 - val_loss: 0.0692 - val_acc: 0.9788
Epoch 2/12
60000/60000 [==============================] - 57s 946us/step - loss: 0.0894 - acc: 0.9732 - val_loss: 0.0400 - val_acc: 0.9873
Epoch 3/12
60000/60000 [==============================] - 57s 946us/step - loss: 0.0666 - acc: 0.9801 - val_loss: 0.0384 - val_acc: 0.9864
Epoch 4/12
60000/60000 [==============================] - 57s 946us/step - loss: 0.0551 - acc: 0.9833 - val_loss: 0.0381 - val_acc: 0.9872
Epoch 5/12
60000/60000 [==============================] - 57s 948us/step - loss: 0.0480 - acc: 0.9856 - val_loss: 0.0341 - val_acc: 0.9896
Epoch 6/12
60000/60000 [==============================] - 57s 947us/step - loss: 0.0414 - acc: 0.9874 - val_loss: 0.0288 - val_acc: 0.9897
Epoch 7/12
60000/60000 [==============================] - 57s 946us/step - loss: 0.0391 - acc: 0.9884 - val_loss: 0.0281 - val_acc: 0.9905
Epoch 8/12
60000/60000 [==============================] - 57s 947us/step - loss: 0.0332 - acc: 0.9900 - val_loss: 0.0305 - val_acc: 0.9910
Epoch 9/12
60000/60000 [==============================] - 57s 945us/step - loss: 0.0312 - acc: 0.9901 - val_loss: 0.0298 - val_acc: 0.9918
Epoch 10/12
60000/60000 [==============================] - 57s 946us/step - loss: 0.0310 - acc: 0.9902 - val_loss: 0.0292 - val_acc: 0.9915
Epoch 11/12
60000/60000 [==============================] - 57s 948us/step - loss: 0.0276 - acc: 0.9915 - val_loss: 0.0276 - val_acc: 0.9913
Epoch 12/12
60000/60000 [==============================] - 57s 948us/step - loss: 0.0251 - acc: 0.9921 - val_loss: 0.0335 - val_acc: 0.9892
Test loss: 0.03348822974714749
Test accuracy: 0.9892
정상적으로 학습되는 것을 확인하였다.
7. 인스턴스 종료하기
인스턴스 종료 안하면 돈이 계속 나간다..
a. 실행중인 인스턴스

b. 작업 - 인스턴스 상태 - 종료

종료한 상태로 스샷을 찍었더니 비활성화 되어있다.
위에 글 참고해서 서버 만들긴 했는데 서버 연결법을 몰라서 아래 영상을 참고했다.
EC2에 연결하는 4가지 방법
https://www.youtube.com/watch?v=fytZgsmGwk8
첫 접속
처음 서버에 접속해서 ls를 쳐보니 아래와 같은 폴더 및 파일이 보였다.
ubuntu@ip-172-31-34-105:~$ ls
LICENSE  Nvidia_Cloud_EULA.pdf  README  anaconda3  examples  src  tools  tutorials
그러고 바로 깃 클론 시도
ubuntu@ip-172-31-34-105:~$ git clone https:~
Cloning into 'docker_ner_intent'...
fatal: unable to access 'https:~': server certificate verification failed. CAfile: /etc/ssl/certs/ca-certificates.crt CRLfil
e: none
하지만 SSL 인증서 오류가 떴다.
오류는 아래와 같이 해결
ubuntu@ip-172-31-34-105:~$ git config --global http.sslVerify false
그 이후 다시 클론하여 다운로드 성공
ubuntu@ip-172-31-34-105:~$ git clone https:~
Cloning into 'docker_ner_intent'...
Username for 'https:': sonsw~
Password for 'https:':
remote: Enumerating objects: 36493, done.
remote: Counting objects: 100% (36493/36493), done.
remote: Compressing objects: 100% (26087/26087), done.
Receiving objects:   5% (1915/36493), 449.47 MiB | 6.20 MiB/s
하다가~
cyberduck프로그램으로 SFTP 설정하여 연결했다.

아직 남은 숙제
접속은 했는데 torch등의 모듈이 없단다.
pip install torch로 설치가 안 되었다.
라이브러리 폴더 위치 찾아서 필요한 라이브버리들을 직접 넣어줄 계획이다.
다음에 넣어줘야할 폴더 위치 찾아서 라이브러리들 넣어주고 소스를 실행해봐야겠다.
다음날 리눅스 운영체제에서 해본 것들
1. 다음 명령을 사용하여 Python 3용 pip을 설치합니다.
sudo apt install python3-pip2. 설치가 완료되면 pip 버전을 확인하여 설치를 확인합니다.
pip3 --version
3. 리눅스에서 파이썬 실행해보기
ubuntu@ip-172-31-34-105:~/03.AI모델/1. AI 모델 소스코드/01. 개체명인식/nia_project$ python3
Python 3.6.9 (default, Mar 15 2022, 13:55:28)
[GCC 8.4.0] on linux
Type "help", "copyright", "credits" or "license" for more information.
>>> import os
>>> import inspect
>>> print(inspect.getfile(os))
/usr/lib/python3.6/os.py
>>>
4. 리눅스에서 파이썬 실행 끄기
>>> import sys
>>> sys.exit()
ubuntu@ip-172-31-34-105:~/03.AI모델/1. AI 모델 소스코드/01. 개체명인식/nia_project$
5. 파이썬 라이브러리 경로 알아보기
import os
import inspect
print(inspect.getfile(os))
참고싸이트
[환경 설정] 텐서플로우(Tensorflow) 2.x GPU 설정 및 사용하는 법 (윈도우10 기준)
게임할 때에는 컴퓨터가 자동으로 그래픽 카드를 인식하여 작동시키지만, 우리가 데이터 분석을 할 때에는 여러가지 설정을 해주어야 합니다. 오늘은 딥러닝의 가장 유명한 프레임워크인 텐서
doitgrow.com
https://sanghyu.tistory.com/35
Window에서 GPU사용량 모니터링(nvidia-smi/ 작업 관리자)
nvidia-smi 1. cmd창 열기(명령 프롬프트) 2. nvidia-smi.exe 경로 접근 cd C:\Program Files\NVIDIA Corporation\NVSMI 3. nvidia-smi.exe 실행 nvidia-smi.exe 4. 환경변수 설정 매번 경로로 접근하기 귀찮기..
sanghyu.tistory.com
AWS로 딥 러닝 모델 학습하기
https://aws.amazon.com/ko/getting-started/hands-on/train-deep-learning-model-aws-ec2-containers/?nc1=h_ls Train a Deep Learning model with AWS Deep Learning Containers on Amazon EC2 Sorry to disapp..
hanseokhyeon.tistory.com
https://www.youtube.com/watch?v=fytZgsmGwk8
'AWS' 카테고리의 다른 글
| [AWS]Amazon Web Services (0) | 2022.06.03 |
|---|

댓글