1. wisedome 매뉴얼
개인키로 wisedome aws 서버 접속

위 개인키가 있는 폴더위치에서 터미널을 열어 아래 명령어 실행
ssh -i wisedome_keypair.pem ubuntu@ec2-3-37-229-99.ap-northeast-2.compute.amazonaws.com아래와 같은 에러가 뜬다면
(base) sonsangwoo@sonui-Macmini wisedome % ssh -i wisedome_keypair.pem ubuntu@ec2-3-37-229-99.ap-northeast-2.compute.amazonaws.com
The authenticity of host 'ec2-3-37-229-99.ap-northeast-2.compute.amazonaws.com (3.37.229.99)' can't be established.
ED25519 key fingerprint is SHA256:DCyILb5ecfLQg+mvnPd++WdE6cnMxdtSnZe66Qs1FfU.
This key is not known by any other names
Are you sure you want to continue connecting (yes/no/[fingerprint])? y
Please type 'yes', 'no' or the fingerprint: yes
Warning: Permanently added 'ec2-3-37-229-99.ap-northeast-2.compute.amazonaws.com' (ED25519) to the list of known hosts.
@@@@@@@@@@@@@@@@@@@@@@@@@@@@@@@@@@@@@@@@@@@@@@@@@@@@@@@@@@@
@         WARNING: UNPROTECTED PRIVATE KEY FILE!          @
@@@@@@@@@@@@@@@@@@@@@@@@@@@@@@@@@@@@@@@@@@@@@@@@@@@@@@@@@@@
Permissions 0777 for 'wisedome_keypair.pem' are too open.
It is required that your private key files are NOT accessible by others.
This private key will be ignored.
Load key "wisedome_keypair.pem": bad permissions
ubuntu@ec2-3-37-229-99.ap-northeast-2.compute.amazonaws.com: Permission denied (publickey).
개인키가 있는 폴더 위치에서 터미널 열어서
chmod 400 wisedome_keypair.pem권한 바꿔주고 다시 실행하면 된다.
(권한이 777인 경우는 모든 사용자에게 읽기 쓰기 수정 권한을 주는데 그래선 안되므로 에러가 뜬다.)
2-3-37-229-99.ap-northeast-2.compute.amazonaws.com
Welcome to Ubuntu 18.04.4 LTS (GNU/Linux 5.4.0-1025-aws x86_64)

 * Documentation:  https://help.ubuntu.com
 * Management:     https://landscape.canonical.com
 * Support:        https://ubuntu.com/advantage

  System information as of Thu Apr 21 10:52:53 KST 2022

  System load:  1.87                Processes:              183
  Usage of /:   41.5% of 124.02GB   Users logged in:        0
  Memory usage: 4%                  IP address for eth0:    172.31.9.246
  Swap usage:   0%                  IP address for docker0: 172.17.0.1

 * Ubuntu Pro delivers the most comprehensive open source security and
   compliance features.

   https://ubuntu.com/aws/pro

 * Canonical Livepatch is available for installation.
   - Reduce system reboots and improve kernel security. Activate at:
     https://ubuntu.com/livepatch

221 packages can be updated.
152 updates are security updates.

New release '20.04.4 LTS' available.
Run 'do-release-upgrade' to upgrade to it.


Last login: Thu Apr 21 10:02:58 2022 from 49.166.61.17
가상 환경 접속/해제
접속
source ~/pybossa/venv/bin/activate해제
deacitvate
Cyberduck 설정
설치 후

왼쪽 아래 + 버튼

서버 입력란에는 아래 내용 복붙 했음.
http://ec2-3-37-229-99.ap-northeast-2.compute.amazonaws.com/프로젝트 생성
PostgreSQL >= 9.5 버젼 이상 설치
터미널에서
brew install post
brew install postgresqlError: No developer tools installed.
Install the Command Line Tools:
xcode-select --install
이런 문구가 뜬다면
xcode-select --install


이렇게 설치해주자.
설치가 완료되면, xcode-select를 실행해서 잘 설치되었는지 확인해봅니다.
$ xcode-select --version
xcode-select version 2384
정상적으로 설치된 것을 확인할 수 있습니다.
사실 xcode-select 명령어가 아니더라도, 명령어 라인 도구에 포함된 명령어를 실행하면, 설치 팝업이 나타납니다. 예를 들어 명령어 라인 도구가 설치되어있지 않을 때 git을 실행하면 다음과 같은 팝업이 나타납니다.

git을 실행해도 명령어 라인 개발자 도구를 설치할 수 있습니다
명령어 라인 도구는 맥에서 프로그래밍을 위해서는 필수적인 도구이기 때문에 꼭 미리 설치해주세요.
특정 버전의 명령어 라인 도구 설치하는 방법
명령어 라인 도구는 애플 공식 개발자 페이지(Apple Developer)에서도 다운로드 받을 수 있습니다. 단, Apple Developer 계정이 필요합니다.
다운로드 페이지를 열고 Command Line을 검색하면 다운로드 받을 수 있는 모든 버전이 나타납니다. 최신 베타는 물론 오래된 버전도 확인할 수 있습니다.

애플 개발자 페이지에서 특정 버전의 명령어 라인 도구를 검색할 수 있습니다
설치하고 싶음 버전 아래의 View Details를 클릭하면, 아래와 같이 상세 설명과 함께 다운로드 링크가 나타납니다. 설치 파일은 dmg 파일로 제공되며, dmg 파일을 열면 pkg(인스톨러)가 포함되어있습니다.
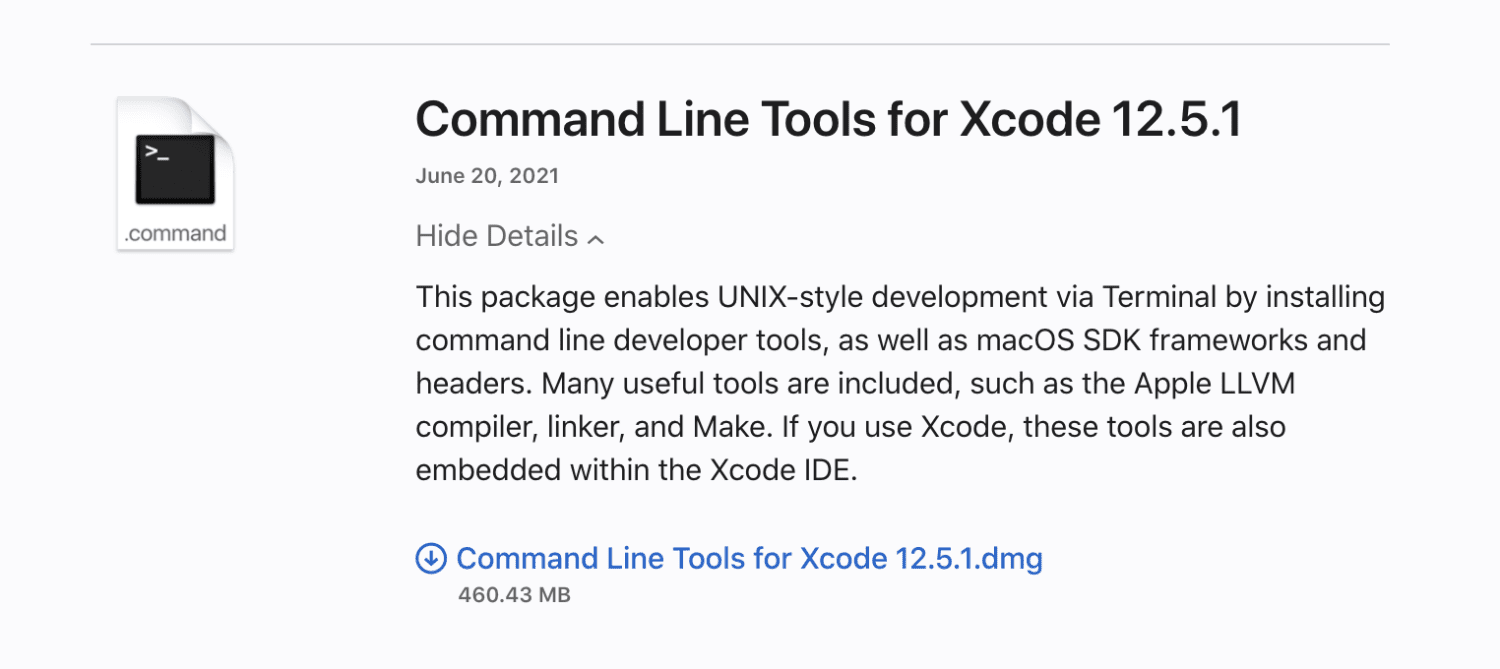
상세 정보에는 명령어 라인 도구의 dmg 파일 링크가 포함되어 있습니다
xcode-select로 설치가 진행되지 않거나, 특정한 버전이 필요한 경우 직접 dmg 파일을 다운로드 받아 설치해보시기 바랍니다.
Xcode 명령어 라인 도구에 포함된 명령어들
그럼 Xcode 명령어 라인 도구에는 어떤 명령어들이 포함되어있을까요? 명령어 라인 도구에 포함된 명령어들은 다음 경로에서 확인할 수 있습니다.
- /Library/Developer/CommandLineTools/usr/bin
설치 경로를 확인해보면, 버전 관리 도구, 소스 코드 빌드 도구, 프로그래밍 언어 인터프리터 등 다양한 도구들이 있습니다. 아래는 현재 제 시스템에서 확인할 수 있는 모든 명령어 목록입니다. 버전에 따라서 목록은 달라질 수 있습니다.
- 2to3
- 2to3-3.8
- DeRez
- GetFileInfo
- ResMerger
- Rez
- SetFile
- SplitForks
- ar
- as
- asa
- bison
- bitcode_strip
- c++
- c++filt
- c89
- c99
- cc
- clang
- clang++
- clangd
- cmpdylib
- codesign_allocate
- codesign_allocate-p
- cpp
- ctags
- ctf_insert
- dsymutil
- dwarfdump
- dwarfdump-classic
- dyldinfo
- easy_install-3.8
- flex
- flex++
- g++
- gatherheaderdoc
- gcc
- gcov
- git
- git-receive-pack
- git-shell
- git-upload-archive
- git-upload-pack
- gm4
- gnumake
- gperf
- hdxml2manxml
- headerdoc2html
- indent
- install_name_tool
- ld
- lex
- libtool
- lipo
- lldb
- llvm-cov
- llvm-cxxfilt
- llvm-dwarfdump
- llvm-nm
- llvm-objdump
- llvm-otool
- llvm-profdata
- llvm-size
- lorder
- m4
- make
- mig
- nm
- nm-classic
- nmedit
- objdump
- otool
- otool-classic
- pagestuff
- pip3
- pip3.8
- pydoc3
- pydoc3.8
- python3
- python3.8
- ranlib
- resolveLinks
- rpcgen
- segedit
- size
- size-classic
- sourcekit-lsp
- stapler
- strings
- strip
- swift
- swift-api-extract
- swift-build
- swift-demangle
- swift-frontend
- swift-package
- swift-run
- swift-stdlib-tool
- swift-symbolgraph-extract
- swift-test
- swiftc
- tapi
- tapi-analyze
- unifdef
- unifdefall
- unwinddump
- vtool
- xml2man
- yacc
명령어 라인 도구에는 많은 도구들이 포함되어있지만 최신 버전은 아닌 경우가 많습니다. 최신 버전이 필요하다면 맥의 패키지 매니저 Homebrew로 설치해보는 것을 추천합니다. 참고로 Homebrew를 설치하려면 명령어 라인 도구가 필요합니다.
https://www.lainyzine.com/ko/article/how-to-install-command-line-tools-on-macos/
맥에서 명령어 라인 도구(Command Line Tools) 설치하는 방법
맥의 Xcode에는 GCC, make, git 등 개발 환경 구성을 위한 도구들을 포함하고 있습니다. 이 글에서는 Xcode 설치 없이 명령어 라인 도구를 설치하는 방법을 소개합니다.
www.lainyzine.com
설치 후 재시작을 위해
brew services restart postgresql버젼 체크
postgres -V
이제 DB에 접속 해 보겠습니다.

Default 접속 계정을 확인하려고 PostgreSQL 의 Document를 확인하는데, PostgreSQL이 설치시 자동으로 계정을 생성해준다고 써있습니다.
정말인지 접속 해서 확인 해 보겠습니다.
psql postgres
아래 명령어로 role 리스트를 확인 할 수 있습니다.
\du

정말로 shane 이라는 Superuser가 생성되어 있습니다. Q 를 입력해 빠져나옵니다.
이제 Client로 접속 해 보겠습니다.
PostgreSQL Client Tool로는 TablePlus, Psequel(MYSQL의 Sequel Pro 입니다), SQLPro, Postico 등이 있다고 하는데요. 저는 DBeaver가 설치되어 있어 있던 걸 사용하겠습니다.
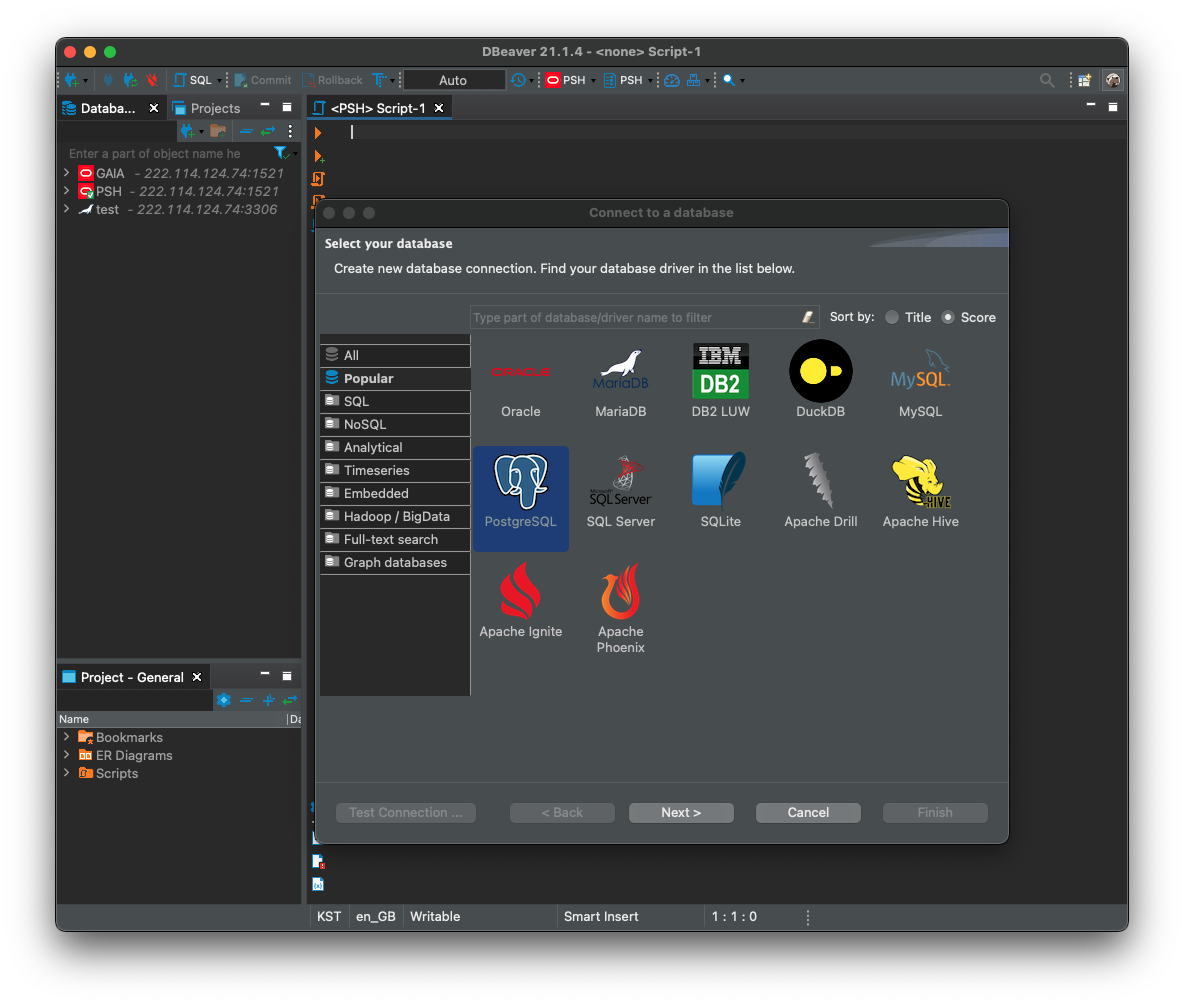
PostgreSQL 을 선택 하고
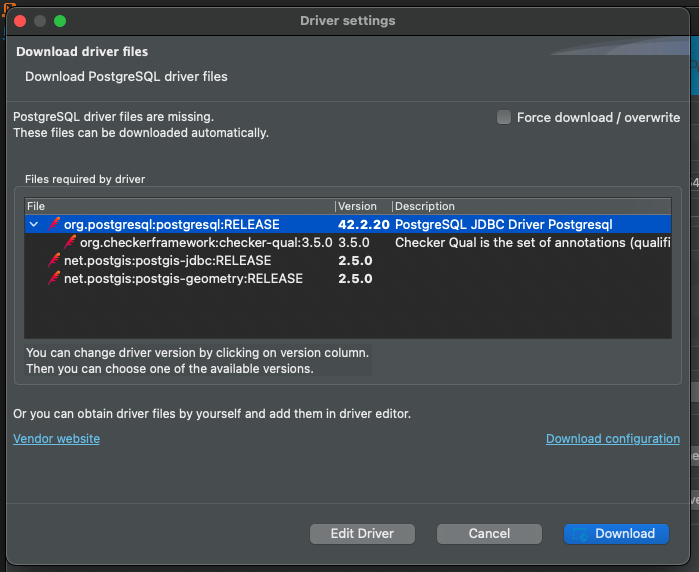
필요한 Driver를 다운 받습니다.

PostgreSQL 에서 위에서 확인한 shane을 입력해 Test Connection 을 수립해보니 정상적으로 연결이 됩니다.
study라는 이름의 database를 만들어보겠습니다.
create database study;
testuser라는 이름의 user를 생성합니다.
create user testuser with encrypted password 'testpass';
testuser에게 데이터 베이스 생성 권한도 부여합니다.
alter user testuser createdb
\du 로 확인해보니 권한이 잘 설정 되었습니다.
생성한 유저에게 아까만든 study 데이터베이스에 대한 모든 권한을 주겠습니다.
grant all privileges on database study to testuser;

연습용 Database기 때문에 모든 권한을 부여하지만 권한 설정을 자세하게 하려면 아래를 참고해주세요

https://www.postgresql.org/docs/13/sql-grant.html 에서 확인 할 수 있습니다.
데이터 베이스 리스트 보려면 아래와 같이 입력합니다.
\list
아래 명령으로 테이블 리스트를 볼 수 있습니다.
\dt아직 아무 테이블도 존재하지 않아서 아래 사진처럼 Did not find any relations. 라고 합니다.
\connect 데이터베이스 이름을 입력하면 해당 데이터베이스로 연결합니다.
\connect study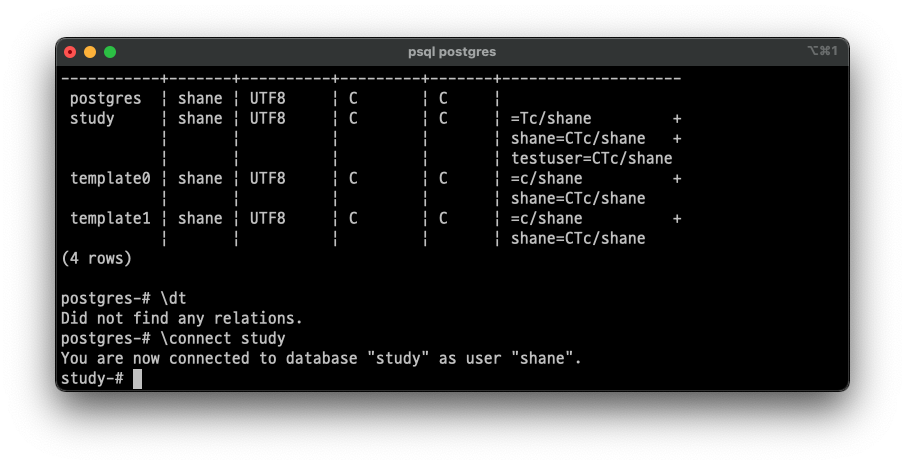
추가한 사용자로 접속해보겠습니다. -U 명령어와 username 을 입력 합니다.
psql postgres -U testuser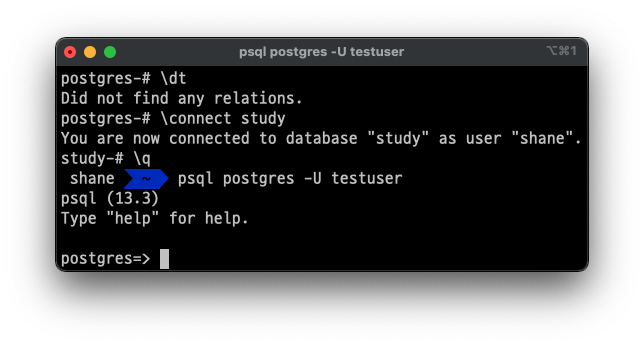
postgres-# 에서 postgres=> 으로 바뀌었습니다. #은 super user를 뜻 합니다.
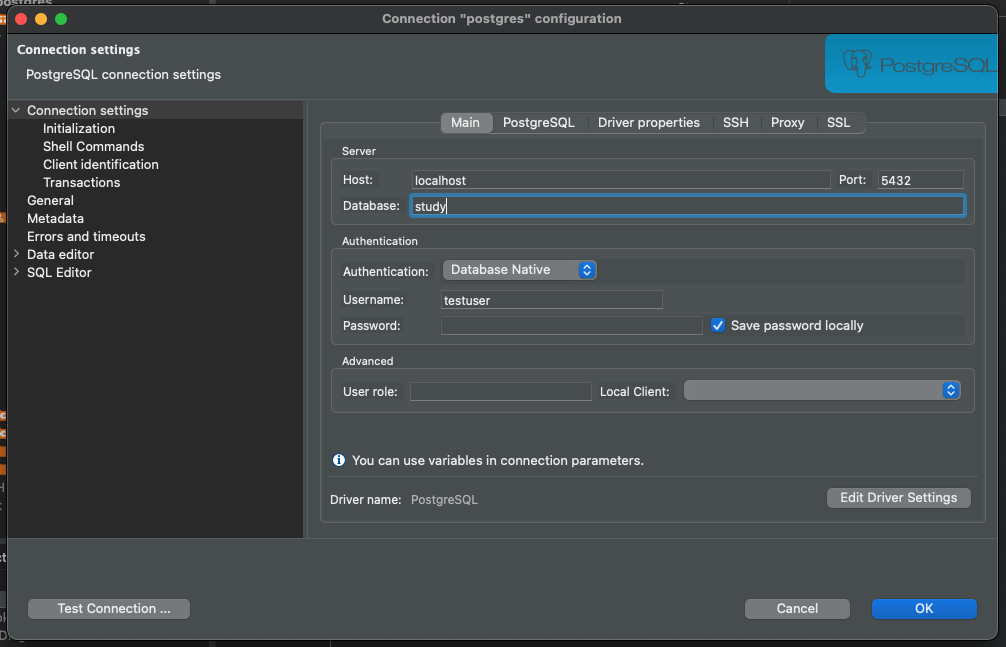
새로생성한 study Database에 새로 생성한 testuser로 DBeaver 에서 접속 해 보겠습니다.

테이블이 하나도 없으니 emp 테이블을 만들겠습니다.
CREATE TABLE dept ( deptno NUMERIC CONSTRAINT PK_DEPT PRIMARY KEY, dname VARCHAR(14) , loc VARCHAR(13) ) ;CREATE TABLE emp ( empno NUMERIC CONSTRAINT PK_EMP PRIMARY KEY, ename VARCHAR(10), job VARCHAR(9), mgr NUMERIC, hiredate DATE, sal NUMERIC(7,2), comm NUMERIC(7,2), deptno NUMERIC(2) CONSTRAINT FK_DEPTNO REFERENCES DEPT );데이터도 넣어줍니다.
-- Insert test data - deptINSERT INTO dept VALUES (10,'ACCOUNTING','NEW YORK');INSERT INTO dept VALUES (20,'RESEARCH','DALLAS');INSERT INTO dept VALUES (30,'SALES','CHICAGO');INSERT INTO dept VALUES (40,'OPERATIONS','BOSTON');-- Insert test data - empINSERT INTO emp VALUES (7369,'SMITH','CLERK',7902,to_date('17-12-1980','dd-mm-yyyy'),800,NULL,20);INSERT INTO emp VALUES (7499,'ALLEN','SALESMAN',7698,to_date('20-2-1981','dd-mm-yyyy'),1600,300,30);INSERT INTO emp VALUES (7521,'WARD','SALESMAN',7698,to_date('22-2-1981','dd-mm-yyyy'),1250,500,30);INSERT INTO emp VALUES (7566,'JONES','MANAGER',7839,to_date('2-4-1981','dd-mm-yyyy'),2975,NULL,20);INSERT INTO emp VALUES (7654,'MARTIN','SALESMAN',7698,to_date('28-9-1981','dd-mm-yyyy'),1250,1400,30);INSERT INTO emp VALUES (7698,'BLAKE','MANAGER',7839,to_date('1-5-1981','dd-mm-yyyy'),2850,NULL,30);INSERT INTO emp VALUES (7782,'CLARK','MANAGER',7839,to_date('9-6-1981','dd-mm-yyyy'),2450,NULL,10);INSERT INTO emp VALUES (7788,'SCOTT','ANALYST',7566,to_date('13-07-87','dd-mm-yyyy')-85,3000,NULL,20);INSERT INTO emp VALUES (7839,'KING','PRESIDENT',NULL,to_date('17-11-1981','dd-mm-yyyy'),5000,NULL,10);INSERT INTO emp VALUES (7844,'TURNER','SALESMAN',7698,to_date('8-9-1981','dd-mm-yyyy'),1500,0,30);INSERT INTO emp VALUES (7876,'ADAMS','CLERK',7788,to_date('13-07-87','dd-mm-yyyy')-51,1100,NULL,20);INSERT INTO emp VALUES (7900,'JAMES','CLERK',7698,to_date('3-12-1981','dd-mm-yyyy'),950,NULL,30);INSERT INTO emp VALUES (7902,'FORD','ANALYST',7566,to_date('3-12-1981','dd-mm-yyyy'),3000,NULL,20);INSERT INTO emp VALUES (7934,'MILLER','CLERK',7782,to_date('23-1-1982','dd-mm-yyyy'),1300,NULL,10);이제 emp 테이블을 조회 하면
select * from emp;
문제 없이 조회 결과를 받아 올 수 있습니다.
select empno, ename, dnamefrom emp inner join dept on (emp.deptno = dept.deptno);
join 도 Oracle이나 MySQL 에서 썼던것처럼 ANSI SQL을 그대로 사용하면 됩니다.
select dept.deptno, dname, count(empno)from dept left outer join emp on (emp.deptno = dept.deptno)group by dept.deptno, dnameorder by deptno;
group by 집계 함수도 사용 해 보았습니다. Oracle 데이터베이스를 처음 공부할 때 배우는 내용인데요, deptno=40에 해당하는 emp가 없기 때문에 count(*) 을 넣으면 의도한 값이 나오지 않습니다. count(empno)라고 입력합니다.
select deptno, ename, salfrom( select deptno, ename, sal, rank() over(partition by deptno order by sal, empno) as rank from emp) ewhere rank = 1;이번에는 각 부서별 최저 급여를 받는 사원 정보를 조회해 보았습니다.

여기에서 특이한 점을 찾았는데요, Oracle에서는 아래와 같이 썼어도 괜찮았는데
select deptno, ename, salfrom( select deptno, ename, sal, rank() over(partition by deptno order by sal, empno) as rank from emp)where rank = 1;PostgreSQL 에서는 FROM절에 있는 Subquery (Inline View) 는 반드시 alias를 가져야 한다고 하며 실행이 되지 않습니다.

select deptno, ename, salfrom emp e where e.sal = (select min(sal) from emp where deptno=e.deptno)order by deptno;다른 방식의 서브쿼리로도 해결 할 수 있지만, 이 방법은 최저 급여를 받는 사원이 여러명일때 그 여러명이 모두 나오기 때문에 조회 결과가 의도와 다를 수 있습니다.
이상으로 MacOS 에서 PostgreSQL 설치하고 접속하는 방법에 대한 포스팅을 마치겠습니다.
https://shanepark.tistory.com/186
MacOS PostgreSQL 설치 하고 테이블 생성, 조회하기
MacOS PostgreSQL 설치 하고 테이블 생성, 조회하기 PostgreSQL PostgreSQL은 확장 가능성 및 표준 준수를 강조하는 객체-관계형 데이터베이스 관리 시스템의 하나 입니다. 오픈소스 RDBMS로서 사용율은 Or
shanepark.tistory.com
댓글